Pages

Nov 30, 2011

Happy Christmas

Kayleigh and I love Harry Potter. It's no secret. I also let you know last week that my Christmas theme for this year is "Harry Potter", so today I have a craft that I'm using to decorate my tree. 

"Happy Christmas" Scrolls


what you'll need: a brown paper bag or two, pen, scissors, and possibly matches or a lighter
cost: free! get the bag from the grocery store next time you go 
difficulty level: this is a great craft for kids if you skip the fire part. I will not be responsible if they burn your house down, fair warning.  


first cut strips of paper about 1 1/2" x 6".

then write "Happy Christmas" or another special holiday message in your best writing... or you can just say Hagrid wrote it :).  This is where you can burn the edges to make it look beat up, or you can tear them if you'd like the look better.


Next roll the edges of one side up, and the other side down.


AND NOW get to decorating! I love Christmas so much!!! Harry Potter Christmas just makes me happy in my heart.


Yes, by the way, I am aware that I am a grown woman who has no children to use as an excuse for all this.... but my apartment will be a magic winter wonderland just like Hogwarts.


Nov 27, 2011

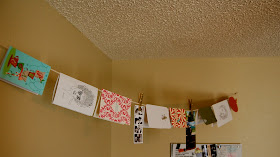
Christmas Card Hanger


Getting lots of Christmas cards already like I am?? Seriously, how are these people so fast?! Anyway, here is an easy, free way to display them in your home as decorations.

Cost: FREE
Difficulty level: EASY

You need:
Yarn, string, or thin rope
Push pins


*Hang the string or rope between two walls using the push pins as anchors. >> OR hang it across the mantle, or drape on one wall...really you can put it anywhere.
*Add your cards!


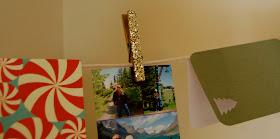
If you get lots of photos and post cards, hang them using a clothes pin. Of course, I glittered mine first ;)

You can always add more rope if you run out of room! Didn't I say it was easy?! You're welcome.


Nov 26, 2011

No-Sew Ruffle Tree Skirt


Christmas is my favorite time of year. I love decorating so much that I think I actually scared my husband yesterday with my enthusiasm.... Anyway, this year's Christmas theme at my place is Harry Potter-so think the Weasley's house meets Hogwarts at Christmas. I've seen this tree skirt around the blogs lately and I had to make it!


what you'll need: Fabric for skirt base and ruffles. (this takes a little math and will be different depending on the size of your tree.) My skirt base is 17" long so I used about a yard of muslin fabric for that, plus about 2 1/2 yards of muslin for the ruffles. You will also need fabric glue, scissors, and a measuring tape. 
*fabric note: this would also work well with felt!


cost: less than $10


difficulty level: easy


First, I took my 2 1/2 yards of unbleached muslin and ripped it into strips that are 5-6" wide and 2 1/2 yards long. I like the unfinished edges, but if you really want to get crazy you can finish your ruffle edges with ribbon or a roll hem, but do it before you attach them to the skirt base.


Next, I made a circle skirt for my base. Measure the from the tree trunk out passed the branches or as long as you want your skirt to go. Remember there will be a 5" ruffle added to the base. Mine skirt was 17".


Your fabric should already be folded in half when you buy it (Hot dog style) so then you need to fold it in half one more time (hamburger style). 


From the top corner-where all edges are folded- use your measuring tape to mark a quarter circle 1" from the corner. Then another quarter circle 17" (or desired length of skirt) from the corner. Cut along both curves and you will get this:


Then cut a slit like the picture below-this will be the back of the skirt.


Now for the fun part!
I laid down a piece of cardboard first because the fabric glue gets messy.
Line up one ruffle with the slit of the skirt base about 1/2" from the outside edge and start gluing. 


Pleat and glue the fabric around the whole outside edge. If you run out of one ruffle before you reach the end, just overlap another ruffle and continue.


Move a few inches up and glue the next row.

Continue until you reach the center-closest to the trunk. By now, your pleats will need to be small an closer together than the outside row.

Let it dry for a few hours and then wrap your new tree skirt around the tree and admire your handy work! 


P.S. I wanted to do something no-sew for people who don't have machines, but sewing would probably have been faster and longer lasting than the glue.


Nov 23, 2011

World's Easiest Christmas Ornament


Seriously... this took me 1 minute to make. It will take me longer to post this than it did to finish the ornament.

All you do is open up the $1 plastic ornament from Michael's, stick a feather inside, and close it up!

BAM! Simple, pretty, EASY ornament.


You could fill these with anything, really. I'm thinking about filling a few with pom poms, maybe some yarn or thread, or just tons of glitter. Get creative!

Nov 21, 2011

Book Page Ornaments!


I started making these simple little ornaments for my Etsy shop, and people seem to love them! They make great gifts for people who love books. But really, you could use any type of paper. Go crazy!

Cost: Less than $3 (if you already have Mod Podge!)
Difficulty level: Easy, but messy

You Need:
Plastic, clear ornaments ($1 each at Michael's right now)
Book pages or other paper
Mod Podge & applicator
Scissors
Glitter is optional, but always encouraged ;)


Prep: cut up a few pages into thin strips so they are ready to go.
Step One: apply a thin layer of Mod Podge to the ornament. Then lay on 1 or 2 strips of paper.


Step Two:
Apply another thin layer of Mod Podge on top of the strips.


>>>>Repeat steps 1 and 2 until you've covered the whole ornament<<<<

Step Three:
Let the ornaments dry completely. If you want, you can spray them down with spray glitter. Just go outside first!


You'll probably also want to add a hanger, I just used some random black ribbon.

I made mine out of a recycled Harry Potter book. If you like that idea, but don't want to cut up your books, you can buy one from me here: Kayleigh's Etsy Shop
*Mention the blog at checkout, and I'll refund your shipping price!

Nov 16, 2011

Zipper Bracelet Fun!

I found this way cool Zipper Bracelet Tutorial by Cut Out + Keep.
I followed it, with just a few changes. The result.. SUPER cheap, fast, and easy. Have fun with it!


*I used a red, 7 inch jean zipper from JoAnn's. Only $2!!
*I couldn't find the cool lobster claw clip that had a base on it, so I just sewed mine to the end of the zipper. That only cost $1!
*I cut out the step of putting glue on the back. It doesn't hurt my wrist at all, so I didn't need it.

I LOVE how it turned out! It literally took me 5 minutes. And Iwill be making a few as Christmas gifts this year. Shh.. don't tell Katie ;)

Nov 14, 2011

yarn wrapped bracelets


what you'll need: some yard, some bracelets, and some hot glue
cost: $5-or free for me cause I had all this around the house!
difficulty level: if you are tangle-prone (like me) then medium... if you are normal this should be a piece of cake. or pie, whichever you prefer.


Before bracelets!


In an effort to prevent tangles I did this with a few yards of yarn......


To start it out: just put a dab of hot glue on the inside of the bracelet and press the yarn into it to secure.


Wrap the yarn covering the hot glue dot and working your way around the whole thing. Keep the yarn pulled tight and wrap closely together.


This is about the point where my yarn tangled despite my best efforts. "Nice try, Katie." is what you can say right here if you'd like. I'll be untangling yarn for a few minutes, feel free to take a coffee break ;)


You will run out of yarn and some point (or you will tangle it and have to cut yourself free), so just tie another piece to the one that's about to run out and make sure the knot will be at the inside of the bracelet. Trim the knot tails and keep wrapping!


To finish, just put another dab of hot glue and press the yarn in so the fibers get all caught up.


 I made another one in a smaller size. 


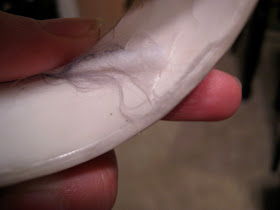
And then I gave it a haircut since I used fuzzy yarn and it looked like I made a bracelet out of Nico (my dog). She was not amused when I told her this would be her punishment if she didn't stop looking at me like that.


Finished! Now I have 2 fuzzy yarn wrapped bracelets. Make a couple more of these and you can keep wearing your summer clothes all the way through winter. Who needs sleeves when you got an arm full of these bad boys. 


Nov 10, 2011

Etsy Dallas Craft Fair

Jingle Bash is coming.... Who's going with me?!

Nov 9, 2011

Yarn Pom "Flowers"

Super easy and FREE decoration for fall.

Cost: FREE (unless you need to buy yarn..get the cheap kind)
Difficulty level: Ridiculously easy

You need:
yarn
sticks
scissors


Step One: 
Choose a color of yarn and wrap it LOOSELY around your hand about 100 times.

Step Two:
Slip the yarn off your hands, and tie it across the middle with another piece of yarn to make a ball.

Step Three:
Cut the loops open with your scissors.


Final Step:
Put the sticks through the middle of the yarn balls, and put in a vase! 

Note to self:: Maybe don't use grey yarn... it looks like I've been dusting with it. Ooops...