Pages

Jan 31, 2012

Cutesy Felt Pouch

The inside of my purse is atrocious. Seriously... if you can put it in a purse, then I have lost it in a purse. It's full of receipts and random scribbled notes I throw in there, plus a million other mystery objects. Mary Poppins ain't got nothin' on me....
But, I digress.....


This is a little felt pouch I have made to help organize my bag a little more. It could also make a cute little wallet or clutch if you have a little girl that likes to dress up!


What you'll need: 8x10" felt in multiple colors, embroidery floss, a needle, some scissors/pinking shears. The button is optional-Velcro could also work.

cost: $5

Difficulty level: easy, and it could be made easier and turned into a kid friendly craft with some fabric glue instead of a needle and thread

1. Cut a rectangle with pinking shears. About 3" high x 4" wide. Stitch to the very center of your felt rectangle with a running stitch.


2. Fold the bottom portion up one third. Stitch the outside edges with a running stitch.


3. Cut out shapes to decorate with. I used hearts in honor of February.


4.  (Optional) Sew a button to the pouch and cut a slit into the flap right about the button to create your button hole.


5. Enjoy! You can use this to hold your sunglasses, keep pens together, or even to hold your make-up. The options are endless :)


Jan 24, 2012

Rainy Day Pick-Me-Up


I've been seeing all the fun spring trends floating around the Internet and I'm getting really excited about warm weather and bright colors. But, it's chilly and raining horribly outside tonight. I decided to add a little bit of sunshine to this gloomy evening with a yellow burst of tarty greatness by making this delicious lemon curd from kitchen confidante.

I'm definitely a novice in the kitchen, but I followed these directions with no problems at all.

What You'll Need:
3 egg yolks
1 whole egg
3/4 cup sugar
1/2 cup lemon juice
zest of 2 lemons
4 tablespoons unsalted butter, cut into small cubes


Get cookin'! One thing I've learned (and a lot of you may already know this) is that preparing everything you need first makes it way easier. For example, zest 2 of your lemons before you cut them and squeeze the juice out or you'll be left trying to zest squishy, sticky, and hollow lemon peels. SO....Lay out everything you need, zest, and THEN juice your lemons....before you even crack an egg.....

"In a small saucepan, whisk together egg yolk and egg until combines. While whisking, pour in sugar, lemon juice and zest, and continue whisking until creamy and well incorporated, about one minute. Place over medium heat, whisking constantly, until the custard thickens and can coat the back of a wooden spoon, about 8-10 minutes. Remove the pan from the heat, and stir in the butter, one cube at a time. Strain into a bowl or jar, cover surface with plastic wrap and chill in the refrigerator for at least one hour."


Voila!! This is so so good! I'm going to have to go to Starbucks to get a scone tomorrow morning. What? You want me to make scones for myself now? Baby steps, people. Baby steps. 


Thanks to Liren from Kitchen Confidante for posting this and to David Lebovitz‘s Improved Lemon Curd and Martha Stewart’s Lemon Curd, The Martha Stewart Living Cookbook (MSL Omnimedia, 2000).

Jan 22, 2012

Look! I finally made a "terrarium"


I bought the succulent plant at Ikea for $2!
Then I got the glass, rocks and purple moss at Michaels for about $10.

I have no idea if I planted it correctly, and I'll probably end up killing it, but I love it and it's going to look awesome on my desk tomorrow!

Jan 19, 2012

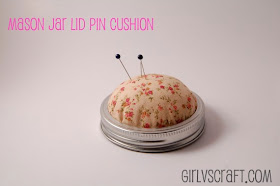
Easiest Pin Cushion Ever


I just got my first personal sewing machine the other day (YAY) and of course that means I NEEDED to get all new stuff for it, right? Well I was super tired of my tomato pin cushion from the 6th grade--you know the one. Instead of blowing all my cash on new sewing supplies, I decided to make a pin cushion for myself.

This one requires no sewing (confusing, I know), and cost me $0! My mom accidentally bought me 10 mason jar lids instead of the actual jar, so now I need to use them. Perfect solution to many issues!

Difficulty: Ridiculously easy
Cost: Free! Or less than $5 if you need a few things.

You'll Need:
A mason jar lid
A scrap of woven fabric (knits will get giant holes)
A little bit of polyfill stuffing

Step 1: (easier explained through photos)


Step 2:
Fold the corners in toward the center of the circle. Glue in place...it's easier that way.

Step 3:
Put the "ring part" of the jar lid around your little circle of batting and fabric. It should almost click into place.


 Finished Product:


You can put it on the actual jar, or set it next to your machine, and I've even seen some hanging on the wall. Way cute and super easy. It took me 5 minutes.


Then I got REALLY fancy... I made a stencil using freezer paper (tutorial coming soon), painted the Pinterest Logo, and made myself a "Pin It!" Pin cushion. It's a little sloppy, but it was my first try! Love it.


Glitter Keys!


As you know, we LOVE glitter. I couldn't resist doing this to my house key the other night. It was so easy and now my key is ADORABLE (just what every boring house key dreams of being)!

Difficulty: EASY
Cost: Free if you have glitter..and who doesn't?

You'll Need:
A key (or many keys)
Mod Podge or regular glue
Glitter
Clear spray paint-- Don't skip this step!

Step 1:
Put your key on a glitter-safe surface. I use foil. Paint one side of your key with you glue.

Step 2:
Pour on the glitter! Let this side dry completely before doing the other.

Step 3:
Repeat steps one and two on the other side of your key.

GO OUTSIDE and spray both sides of you key with the clear coat. This is important! If you don't do this, glitter will fall off everywhere. Trust me, it's a mess.

Once that's dry, you're finished!


If you have lots of keys, do each one in a different color of glitter so you can ID them. Super fun!

Jan 10, 2012

Crafting Play List #1


All of us need a little inspiration from time to time, and music is a great way to get creativity flowing. This is the first {of hopefully many} crafty playlists. There are also explanations for why each song was chosen!


*Note: there is a Beatles song for EVERY situation, however the playlist site doesn't allow them for copy right reasons. Katie also loves Funny Girl by Barbra Streisand for crafting, but they didn't have that either.*


Reasons I chose each song:
1. Lisa Hannigan is not only an amazing singer, she is also crafty. She hand-stiched her entire album art, including ALL the lyrics!
2. Strawberry Swing has an amazingly creative music video. Seriously, look it up!
3. Harry Potter is obviously my inspiration. Hedwig's theme is just pretty.
4. Local Natives was chosen by Jana, and I'm in LOVE.
5. The Weepies are another super creative duo who make beautiful music, and I find it calming when I sit still doing crafts.
6. Andrew Belle was suggested by my boyfriend, again because of his creativity. Look up his videos also!
7. The Civil Wars were suggested by my friend Amy. This song is beautiful.
8. The White Stripes just rule. Like, alot. I also think it's perfect for wintery crafting.
9. Snow Patrol was also suggested by Amy, and this is my favorite song of theirs.
10. Camera Obscura have great songs. This one makes me want to make stuff out of books.

Jan 9, 2012

Quick fix craft

I have an old random tray that didn't really add much to the decor of our apartment. Actually, it was sitting in my closet for awhile gathering dust.
So... I decided to give it a little face lift.


I took some scrapbook paper that I had left over, a stencil, and some paint, and gave my dirty old tray a little purpose.

I matched the patterns on my 2 pieces of scrapbook paper. Then traced my tray and cut out my rectangle of paper.

Then I used a stencil and some paint to add a little dimension.


Glue the paper to the tray. I used decoupage glue and coated the top as well.

If you plan on putting drinks on this tray you'll need to use a lacquer on top to seal it.


And there you have your 15 minute quick fix!


Jan 5, 2012

Munchkin Craft


This was fun, easy, and very cute. 
We let her pick some paint colors and told her to go nuts!
Although, she's a little bit of a neat freak...and when I say "Go Nuts" I mean that she was very apprehensive about mixing paint brushes and colors. She would stop every time she got paint on herself and ask her mommy to wipe it off. We had to coerce her into mixing things up but the end product was great.  


My parents loved the gift! Cheap, easy, and memorable! 


My sister and my 3 year old niece came to visit before Christmas! My sister has the creative gene too, so she brought a blank canvas with her for my niece to paint and give to grandma and grandpa as a Christmas Gift.

Jan 4, 2012

I made a light box! And so can you.

   
One of my goals for 2012 is to re-do my Etsy shop since it's been open for a year now (yay me! Check it out:: www.etsy.com/shop/wearesocrafty )
    The first step was getting new photos of my products in there, so, with the help of my friend Jana (our previous featured seller: Jana's Post ), I created a mini photo studio!


You can buy something similar from Amazon and Ebay, but it'll cost you around $50! Um... no thanks. I made this one for $17. You can do it for less if you already have the stuff!

You need:
*This WikiHow link with great directions (except use white cotton fabric, NOT tissue paper!):: Wiki How Light Box
*A sturdy cardboard box (mine is 18x16 from the container store)
*Box cutter ($2 at home depot--- WORTH IT)
*White cotton fabric (I used $3 "pillow covers" from Target. Jana used a $5 fitted sheet from Walmart. You can also use whatever you have, as long as its white.
*White poster board
*Light source-- a desk lamp works well. Mine was $6 at Target.
*Camera with tripod

>>Follow the Instructions from WikiHow, then test out your new, fancy light box.<<

       Here are 2 of my trial photos:


  That's my mom's ring from Carolyn Pollack, where she works.

My mood ring!


**Camera Settings that worked best for me with the light box**
F. 7.1
Shutter Speed: 25 (use the tripod)
ISO: 800
White Balance: Incandescent +2


These photos, and the ones in my shop, only needed to be cropped! It's amazing what the right light and right settings can do for your photos.