Showing posts with label embroidery thread. Show all posts

Dec 19, 2011

Crafting at Work; Part 2

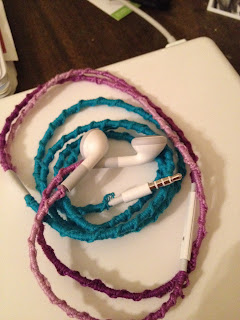
Embroidery Thread Wrapped Headphones


I saw this cool craft all over Pinterest, but none of the photos had a tutorial. So I figured it out for you! You're welcome...

The best part-- your cords won't tangle anymore!!!


GirlvsCraft.com


You'll need:
Your headphones
16 yards TOTAL of embroidery floss. (8 yards for the top 2 strands, and 8 yards for the bottom)
Scissors
This link on how to do the Chinese Staircase Knot that wraps the cord:: http://www.wikihow.com/Make-the-Chinese-Staircase-Bracelet 
PATIENCE-- This took me 4 hours

*Start by tying your thread at the top of your headphone.(#2)

*Then begin the wrapping technique found in the link. It's super, super easy. Don't make this harder than it is ;) (#3 and #4)

* Keep on wrapping until you cover the entire cord. Tie off with a double knot at the end.

Advice...when people ask how you did it, send them here so they can do it themselves. I got suckered into doing another for a co-worker for a grand total of 8 hours of wrapping cord!

Nov 8, 2011

Embroidery Basics


This will build up to something cool. I just haven't decided what that is yet. maybe this:

Just Kidding.... Baby Steps, people. Baby steps...

what you'll need: for any embroidery you will need an embroidery hoop, fabric, hand sewing needles with medium to large eye, embroidery floss, and scissors
cost: not too much and everything but the thread is re-usable!
difficulty level: practice makes perfect... it's not hard, but it takes time

first thing you need to know is about the embroidery thread itself. You don't want to use too long of a thread (1/2 yard is even a little long and you don't want to tangle up and waste thread) and you rarely use all 6 threads. This depends on how thick your stitch needs to be. Most of the time you will be using 2-3 threads.

SO-Cut your desired length and untwist it so you can easily pull 3 threads out-at the same time, not individually.


Second thing you need to know is that you don't double the thread up and tie a knot at the end like you do when you hand sew a button or a hem. Thread the needle and pull through about 6" or so and leave the end untied


Instead of tying a knot at the back you will leave about an 1"- 1 1/2" tail that you will stitch over and secure as you embroider. Don't ask me why. It's just how I was taught.

First stitch I'm demonstrating is the back stitch. Kayleigh used this one for her "thark you" card. It's basic and great for basic lines.

Take one stitch, then push the needle through to the top again the same length as the first stitch you took.

Now comes the back stitch part... push the needle back through to the bottom right above the first stitch you took. this fills in the space.


Repeat...


Next stitch is a Stem Stitch. Very similar to the back stitch this works well for straight or curved lines and is most commonly used for.... (drum roll please)..... flower stems. Also works well for words and names and things with letters :)

Take one stitch, then push needle up to the top side of hoop at the center of your first stitch to one side... I like the left side...


repeat :).....


Now, this is already a long post, and there are many many more stitches to show you... so you'll have to check back. Sneak preview, because I know you are on the edge of your couch, I will show you a split stitch, chain stitch, french knot, satin stitch, blanket stitch, suture stitch (just making sure you're paying attention... I will not be showing you that)... and many more. 

Note: I am aware that I am a giant nerd and I love embroidery. I do. It's pretty. I hope you like it as much as me and try some fun things

Nov 2, 2011

Kayleigh tries to embroider....

For some reason I decided that it was a good idea to make a hand emboidered card. In theory it's a great idea, especially since I have so much thread...
BUT it's harder than it looks, people!

I bought some premade cards at Michael's for $4, and used some thread and needle I already had:
Then, I wrote out the word "Thanks" a bunch of times, chose my best one, and lined it up on top of my card:
Then I used a thumb tack to poke holes tracing the letters. ** DO THIS ON A MAGAZINE! And, be patient, it takes forever.

(I also did a border)

Then I threaded my needle, making a tangled mess of my thread and certainly not doing proper "emboidery technique":
BUT, I do know how to sew a backstitch-- essential for making this look like handwriting. So I began:
And somehow made my "n" look like an "r"... Tharks, everyody....geez.


I kept on going and finished the word, even though I ran out of thread TWICE and had to re thread some more.

Then I thought it was a good idea to do the border, since I had already poked the holes. That itself took about 45 min. AND if you get even one stitch out of place, the whole line looks crooked!

But whatever, it's done and now I know to take my time and get more thread. Oy.

ThaRks for reading....

Sep 20, 2011

Vintage Embroidery Thread Hair Comb...

This craft is quick, cheap, and actually kind of fun! Again, I saw something similar posted on Pinterest, and thought, "I can do that!" So I did...and SO CAN YOU!!

Cost: $5-$10 will get you about 12 of these things!  (free if you already have this stuff)
Difficulty level: EASY!!

Materials you need:
Hair combs ($4 for 12 of them at Walgreens)
Embroidery thread (mine came in that huge jar for $9 at a vintage shop)
Scissors and glue gun

Step one: choose your colors, and cut about 12 inches of each. This was my hardest step because I had so many colors to choose from.


<<<< totally worth the $9!


Step two:
Start at one end of your comb, and wrap the thread in between the teeth of the comb in an X shape like so...


It's ok if there is hanging thread, just tuck it behind the next color as you go.


Keep on wrapping in whichever pattern you chose. As you can see, I was tired and messed up my pattern. Oops....

Last step: put a dab of glue at the end of the last wrapped color. I also went back and tacked down the loose ends with the glue gun.


  **Here's a silly shot of what it looks like in my hair ( no one was home to help me take it haha)


From a cheap little hair comb, to a totally cute, crafty accessory. See, I told you that you could do it!               >>>>


Now I have all this left over thread.... friendship bracelets anyone?!?!