Dec 30, 2011

Happy New Year-- Free Printable Banner

Download this super cute "Happy 2012" New Year's Banner from Super Mom Moments !


*Just click this link for the PDF file: Happy2012.pdf
*Print. (perhaps on cardstock)
*Cut out.
*String on ribbon or yarn.
*Hang!

Happy New Year, crafty friends!
Love, Katie and Kayleigh

Dec 28, 2011

The Most Dangerous Craft

Cut Wine Bottle Candle


Cutting this wine bottle and turning it into a candle for my mom is by far the most dangerous craft I've ever done. But it was SO MUCH FUN! There is fire involved, so of course it's fun. Just don't burn down the house....

Cost: Less than $20 (that includes the $7 wine I bought and then sadly wasted by pouring it out)
Difficulty: Medium- hard, depending how you feel about fire to cut things.


You Need:
An empty, clean wine (or beer) bottle
Yarn
Nail polish remover
Lighter
Microwavable soy wax and wicks
Container to melt the wax
A hair dryer (not pictured)

Step 1: Fill your sink with cold water, then follow this video on how to cut the glass bottle. The music is cheesy, but the instructions are helpful:


It took me a couple tries to get over the shock of a burning bottle in my hand, but I did it!! I was seriously jumping up and down with excitement... ridiculous, I know.


Now, the hard part is over!! Just sand down the edges of the glass, and dry off your new wine bottle container, and move on to Step 2.

Step 2:
Following the instrutions on your package of wax, melt about 3/4 pound in a glass container in the microwave:
Step 3:
While that's melting, put your wick in the cener of the bottle and use a pencil or skewer to hold it in place, like so:
Step 4:
Right before you take your melted wax out of the microwave, use a hair dryer to warm up your container. This helps the wax adhere better.


Step 5:
Slowly pour in your wax. Let it sit for a few hours to cool and harden. DON'T MOVE IT! Then, trim the wick to 1/4 inch.


Ta-Da! A homemade wine bottle candle. Don't burn yourself, guys!


{That way cool print is available on Etsy from OhLouise!  Wine Lovers Print }

Dec 22, 2011

MOM Craft!

I got my craftiness (and cuteness) from my Mommy! She made this wine cork wreath the other day as a gift. It's pretty easy, and a good use for all of our corks!


Cost: Around $5 if you already have the corks!
Difficulty: Medium, only because it involves a drill

You'll Need:
Corks (about 22 for a full wreath, this one has about 12)
A drill with a tiny drill bit
Floral Wire
Small jingle bells (ours were a little bit too big)
Scissors or wire cutters
Ribbon to hang it at the end!

Step 1:
Drill a hole on each side of your corks. 2 on top, and 2 on bottom that MATCH UP with each other. Do all of them before you start to make the wreath.

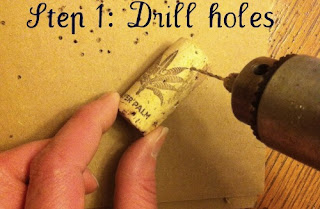
(Oooh she used the fancy corks!)
 Step 2:
Start stringing the corks onto the floral wire at the TOP.

Put a jingle bell in between each cork as you go.


**Then string the bottoms together with another piece of wire. This will create your circle!**


Tie the wires together at the end to finish of the circle. Then, add a pretty ribbon so you can hang it up!


If my mom can do it, you can do it!! Good job, mommy!

Dec 21, 2011

Christmas Tree Sweater

What do you do when you are invited to an Ugly Christmas Sweater party, but can't find an ugly sweater?!?! You PANIC!!! That's what you do.


OR, you get to crafting. 


This is a super easy craft so I'm not giving you a step by step. Making a Christmas Tree Sweater involves a hot glue gun and a hand sewing needle so if you can't fill in the blanks of this incomplete how-to then we need to have a little talk...


what you'll need: felt, fabric glue, ric rac, garland, embroidery thread, etc. I also used a small tree topper, some wire, and a head band to make myself a little star hat.
cost: less than $10, but I did have to buy a sweater (Walmart) so count in $12 more.
difficulty level: easy as pie


All you have to do is make some ornaments in different sizes, colors, and patterns. I hot glued a little tree garland to the backs of a few ornaments to add some festive sparkle. Then, I used a hand sewing needle and some embroidery floss to attach them to the sweater. Just tie a little bow and you'll be able to re-wear the sweater if you want to.


Ta-Da! You now have yourself a not so ugly Christmas sweater. You're actually pretty darn cute! ;)


PS. My apologies for the grainy photos... some of these came from my super awesome iPhone (still the 3G...).

Dec 20, 2011

Glitter Wine Bottles


These are a couple wine bottles I attacked with glitter to add to my magical Christmas decor. 


what you'll need: a couple wine bottles, some glitter, glue, and a sponge brush.
cost: not counting the wine-these are relatively cheap/free if you've done basically any of the other crafts on this blog... we really like glitter...
difficulty level: easy


All you have to do (after you've cleaned off the bottles and removed the labels) is brush some glue from the bottom of the bottle and up towards the middle.


Roll in glitter.


Let it dry a little and brush off the excess glitter.


repeat!


I put long taper candles in the wine bottles first, but I don't know how I feel about them. 


So, I also tried it out as a vase with some of the extra berry things I have from my tree.


I'd really to get some more of these for next year and maybe even use glitter that matches the color of the bottles... we shall see ;)


Dec 19, 2011

Crafting at Work; Part 2

Embroidery Thread Wrapped Headphones


I saw this cool craft all over Pinterest, but none of the photos had a tutorial. So I figured it out for you! You're welcome...

The best part-- your cords won't tangle anymore!!!


GirlvsCraft.com


You'll need:
Your headphones
16 yards TOTAL of embroidery floss. (8 yards for the top 2 strands, and 8 yards for the bottom)
Scissors
This link on how to do the Chinese Staircase Knot that wraps the cord:: http://www.wikihow.com/Make-the-Chinese-Staircase-Bracelet 
PATIENCE-- This took me 4 hours

*Start by tying your thread at the top of your headphone.(#2)

*Then begin the wrapping technique found in the link. It's super, super easy. Don't make this harder than it is ;) (#3 and #4)

* Keep on wrapping until you cover the entire cord. Tie off with a double knot at the end.

Advice...when people ask how you did it, send them here so they can do it themselves. I got suckered into doing another for a co-worker for a grand total of 8 hours of wrapping cord!

Dec 16, 2011

More Last-Minute, Handmade Gift Ideas

Today... things in jars! This is super easy, and good for neighbors, co-workers,teachers... anyone, really!

The "Gunny Sack" blog has some great ideas, plus printable labels for each jar. Check it out here: http://www.thegunnysack.com/2011/10/everything-in-jar-handmade-gifts.html


You can get many of these things at the Dollar Store, and in the sample section at Target! I've seen Mason jars for really cheap at WalMart (just be careful with all the crazy shoppers!)

Get creative and customize these for each person's needs and tastes.


Also, Ryan Gosling has some more words of encouragement as you complete your handmade holiday gifts:


Word.

Dec 13, 2011

OMG Christmas is coming!

Umm.... Holy cow. Christmas is 12 days away. Since we will never have enough time to demo all the cool crafts you could make in the next 12 days, I'm sending you a few amazing links to some kick-ass hand made gifts. You're welcome, my fellow procrastinators!


First Up, 101 Simple Handmade Gifts from the blog "Everything Etsy"
 
101 Handmade gifts LINK


Don't forget to label your gifts! 
Here's the pdf link from Sass and Peril for some adorabe, FREE printable gift tags.


Just print, cut out, hole punch, and tie on. Or do it the lazy way and just cut out and tape ;)

For more ideas and updates, follow us on Twitter: @girlvscraft

Dec 11, 2011

Sunday Craft FAIL

Apparently porceline paint is NOT my strong point.

I've been wanting to make a chevron pattern mug forEVER. I tried it out...and failed. The first attempt looks like a spider web:


And the second is wobbly, smudged, and uneven. 

Oy. I give up. 

Dec 8, 2011

Crafting at Work. Part 1

So, I have this sweet new job where all I do is answer the phone and look cute at the front. Easiest job I've ever had. And the most boring. I figured I could get a lot of crafting done, and I have! Here's the first at-work craft I made: A Felt Bow Bracelet!

I adapted the project from another Blogger's tutorial. Oh The Lovely Things Leather Bow Tutorial  I had a really hard time finding leather, and I didn't think cotton would be stiff enough to retain its shape.
So I chose felt! And at 29 cents a sheet, you really can't beat it!

Cost: Less than $1 !!!
Difficuly: EASY..I mean, I did this at work, people.

You'll need:
To click on that tutorial link and follow the same instructions.
A 12x9 square of felt
Scissors
Thread
Snaps (my mom had lots left over from when she made onesies for me as a baby... yes, we keep everything)

 
            Snaps!  
          My mom did have to help me with the snaps, so don't ask me how. There was hammering involved and lots of noise.      


I think it turned out super cute, and I actually have made one in just about every color.


And if I can do this sitting at my desk, YOU can do it anywhere. Now, go make them for your friends and impress them with your skills.