Sep 13, 2011

Kayleigh vs the Yarn Wrapped Wreath

I've seen some really awesome yarn-wrapped wreaths all over the internet, so I thought I'd try it out. Turns out, it's ridiculously easy, and you have tons of options! I made a super simple, gray yarn wreath so that I could add pretty much anything to it (here I attached a vintage brooch). Let me show you how...
Difficulty level: super easy
Cost: $10 or less

You Need:
- a styrofoam wreath (mine is 9" diameter because I'm cheap and lazy)
-yarn of any color (I used left-over yarn from another project)
-scissors
-hot glue gun
-a ruler
-something to add on (brooch, fabric flowers, small wooden letters, etc)

Step One: Making the hanger
Cut three 12 inch pieces of yarn to braid together. Braid them, and tie off the ends.

Next, make a loop with your braid, and hot glue it to the back of your wreath like so...

Step Two: Start wrapping!!

Take the end of your ball of yarn and hot glue it on the back, near the hanging loop...


Then start wrapping it around the wreath, adding hot glue here and there to make sure it stays tight. Is there anything worse than loose yarn? Well... yeah, but not here!


Keep on wrapping.....


If it looks like that, you're half way there! Don't give up!
When you reach the end, add some more glue (making sure you end on the back), and cut off the excess yarn.


Last Step:
Add your decoration, and hang it up. I added a vintage brooch that I got for 50 cents. Again, I'm cheap and lazy, so there's that.


These wreaths are super versatile. You can make them in different holiday colors, your favorite sports team colors (not my thing, but whatever), you can add whatever you like. I've seen some with flowers, leaves, letters, tiny stuffed animals; pretty much if you can hot glue it, you can add it.

I was victorious with this craft, but be warned... it takes FOREVER (although not as long as the yarn covered letters--coming soon) 
>>>Buy it pre-wrapped from our Etsy Shop if you don't want to wrap it, beause, let's be honest, who loves spending 2 hours wrapping yarn?


Sep 11, 2011

Glitter Letters: Take One

Ok, I want to preface this post with my inspiration for this craft. I think it's important for you to understand my motives...

I saw these awesome glitter letters on the Anthropologie wedding site BHLDN. BUT, I didn't want to spend $34 on them when I thought "I can totally do that!"


What follows is the process of glitter lettering. This is not quite a craft fail, but it's also not a huge success. This is part one. Part two (Hopefully the better part) will follow soon with a few corrections. Feel free to try it the way I first did, but stay posted for a more clean looking result. This one has glitter that's a little thick in some areas and thin in others.

Disclaimer: By the time you finish this glitter craft you will be covered in glitter. Your house will be covered in glitter. Your pets will be covered in glitter.

difficulty level: not hard
cost: about $10

what you'll need:
Glitter Glue, Glitter, X-acto Knife, Foam Core Board, Lacquer Spray.

step one:
Trace your desired letter onto the foam core board. You can print one out from word or you can do it the way I did (probably the hard way) and draw one yourself using a see-through ruler!

step two:
Cut out your letter using the X-acto knife. Cut it out on a cardboard surface or something you don't care about or you'll scratch your table all up.


step three:
This is a good time to cut out holes to thread your ribbon through if you plan on hanging it.

step four:
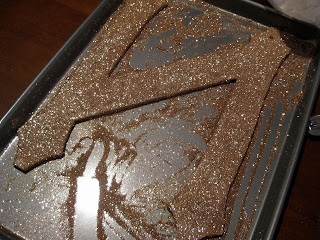
The Messy Part!!! I tried to keep it neat by lining a baking tray with news paper and then putting the letter inside... contain the glitter. Then spread glitter glue all over the letter as evenly as possible.

step five:
Sprinkle glitter all over the letter. Layer it up so that it's well coated. Let it dry and then shake off the excess glitter. There will be areas that didn't get covered, so patch those up with more glue and glitter.
Repeat for the back side (again making sure the front is super dry). Next, you glue and glitter the sides of the foam core. 


step six:
To keep all that glitter from falling off everywhere I sprayed it with the left over clear lacquer spray I had left from the coasters.

Then pat yourself on the back and start vacuuming up all that glitter!

Sep 9, 2011

Featured Etsy Seller: Jana!

 This month's Featured Seller is our friend Jana! She and Kayleigh were roommates for 3 years...then she moved to Montana and started making kick ass jewelry. Her shop is called Hide.Your.Feathers

 Here's what Jana had to tell us::
I always wanted to make my own jewelry but never really sat down and went for it. Finally, in August 2011 I made a necklace for a friend, who kept telling me that I should just go for it, and then just kept creating new pieces because I had all these ideas in my head. I would find myself drawing (sort of, I'm not very good at it..) what was popping up in my mind. I opened up my Etsy shop to start selling to the public and I am continuously adding new, original pieces weekly.

I love using natural stones, brass, wire wrapping techniques, gold, silver, charms, suede, beads, anything vintage or vintage inspired, and geometric shapes. I also just recently started to hand paint pieces so that they are truly one of a kind. I am constantly trying new techniques to keep things interesting.

I am inspired by anything bohemian, Navajo, Native American, and just nature in general. I also believe that I was born in the wrong decade. The 60's and 70's had it going on (but that means I would have to give up my iPhone...hmm).


So..Go check out her stuff! Favorite it, buy it, send it to your friends. It's all so cool and super well made (I bought myself a necklace a few weeks ago)!